


Saturday, 19 July 2014
Creating Password Protected folder in Windows
Creating Password Protected folder in Windows
 Below Mentioned are some easy steps to Perform this Amazing Trick in your Windows PC.
Step 1: Open Notepad and Paste the Below Code in it.
cls
@ECHO OFF
title Trickslove.com
if EXIST "Control Panel.{21EC2020-3AEA-1069-A2DD-08002B30309D}" goto UNLOCK
if NOT EXIST MyFolder goto MDMyFolder
:CONFIRM
echo Are you sure to lock this folder? (Y/N)
set/p "cho=>"
if %cho%==Y goto LOCK
if %cho%==y goto LOCK
if %cho%==n goto END
if %cho%==N goto END
echo Invalid choice.
goto CONFIRM
:LOCK
ren MyFolder "Control Panel.{21EC2020-3AEA-1069-A2DD-08002B30309D}"
attrib +h +s "Control Panel.{21EC2020-3AEA-1069-A2DD-08002B30309D}"
echo Folder locked
goto End
:UNLOCK
echo Enter password to Unlock Your Secure Folder
set/p "pass=>"
if NOT %pass%==trickslove goto FAIL
attrib -h -s "Control Panel.{21EC2020-3AEA-1069-A2DD-08002B30309D}"
ren "Control Panel.{21EC2020-3AEA-1069-A2DD-08002B30309D}" MyFolder
echo Folder Unlocked successfully
goto End
:FAIL
echo Invalid password
goto end
:MDMyFolder
md MyFolder
echo MyFolder created successfully
goto End
:End
Note: the Default password is trickslove so if you want to change the password, simply replace trickslove in the above code with your own chosen password that you can remember.
Step 2: Now save the Notepad file, name it "Lock.bat" and Choose "All Files" in Save type as.
Step 3: Remember the Location where you save the file, now Double click on your Created file which will create a Folder there with the name "My Folder"

Step 5: Press "Y" and hit enter to lock the folder. You will see the My folder is now hidden and cant be seen.
To Unhide the folder, again double click on Lock.bat file, this time it
will ask you the password so if you have not altered the above code then
write "trickslove" and hit enter to unhide the folder.

If you Replaced trickslove with your own password then you will be
needed to enter that password in the CMD to unlock the folder.
That it, we just created a password protected folder in windows by your
own which will be helpful to you whenever you wish to hide your personal
data from others.
Also Read: 3 Simple Tricks to Speedup your PC
Bonus Friendly Tip: Please
do not Cut paste your Important data in to the folder and then hide it
when you are trying this trick for the 1st time. If you do not perform
this trick correctly then may be you will not be able to unhide the
folder and end up loosing your data.
I hope this tuturoal prove to be useful and you will like it. if you
have any trouble then feel free to speak your mind in the Comment box
below. i would love to hear from you.
Hiding Files inside an Image file Secretly
Hiding Files inside an Image file Secretly

Step 1: Create a folder with files that you would like to Hide in an Image file, Lets say the folder name is "Files". Now Right Click on the folder and select add to archive. Select RAR as Archive format and Click OK.
Step 2: You will now see a rar file with name files, Now say you have an image with name "image.jpg" in which we will hide these files. Copy both Files.rar and image.jpg and paste them in " C" or "D" Drive.
Step 3: Next Open CMD, Search for CMD and open it. If you files are in "D" drive then Type D: and press Enter. Now Type in this Code as it is copy /b image.jpg + files.rar new.jpg and press Enter
Step 4: If you have done everything right till now, then you will see something Similar like below Picture. I had the file in E: so i initially typed E: to change the location to E drive.

Step 5: Now Navigate to the location where you saved the file and you will see one for file added with name New.jpg.
Ok So now we have a new file but what next ? If you notice you will se the size of the new file has increased and if you open the new.jpg file it will show you just the picture, So you will as where the other files gone which we tried to hide inside this image ?
We know that the file is in jpg format so we will first Open WinRar archiver, Click on File and Select Open archive.
Now Navigate to the Path where you have saved new.jpg file which will be Drive "D" Now make sure to select All Files from the drop down, so that it displays the new.jpg file too.
Select it and Click on Open, There you will see a folder with name files, Open it and there are your Hidden files.
If you have any problem with this Technique to Hide files inside an image then feel free to Comment below. your Feedback on this trick will also be appreciated. So let me know what do you think in the Comment box
Wednesday, 16 July 2014
Keyboard LED lights Dancing Trick
Keyboard LED lights Dancing Trick
Step 1: Open notepad.
Step 2: Copy the Below Code and paste in it.
Set wshShell =wscript.CreateObject(“WScript.Shell”)
do
wscript.sleep 100
wshshell.sendkeys “{CAPSLOCK}”
wshshell.sendkeys “{NUMLOCK}”
wshshell.sendkeys “{SCROLLLOCK}”
loop
Step 3: Save the File with the name Led.vbs and again choose all files.
Step 4: Double click the File to open, Look down at your keyboard to See the live performance.
How to Stop:
To Stop it just follow the Below Simple Steps.
- Open Task manager by Pressing CTRL+ALT+DELETE
- Now Goto Process Tab
- Scroll down and search for wscript.exe and End the Process.
Make your Computer Speak with NOTEPAD
Make your Computer Speak with NOTEPAD

]]]]]]]]]]]
In the Above trick we made notepad Type automatically but now we will
our own text to Speech tool with the help of small script in Notepad.
You will make your Computer Speak whatever you type. Excited ? Then
follow the Below Simple Steps.
Step 1: Open Notepad
Step 2: Copy and Paste the Below Code in Notepad.
Dim message, sapi
message=InputBox("What do you want me to say?","Speak to Me")
Set sapi=CreateObject("sapi.spvoice")
sapi.Speak message
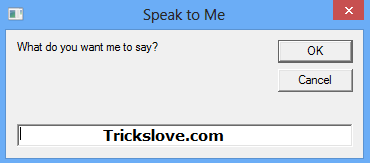 Step 4: Double Click on the File to See a pop up Window that looks something like this Picture
Now All you have to do is Type in Anything that you want it to Convert in Speech.
Then Click on Ok. Wait a second or Two and hear it do its work.
We Have Seen alot of times in movies some kind of numbers in Green Color Flashing really fast
Green Color Flashing really fast
.png)
1) Matrix Effect:
We Have Seen alot of times in movies some kind of numbers in Green Color Flashing really fast. Ever Wondered How they do it ?
Well, Today you will learn it. Basically its a Small Batch file that helps to do it. Just follow the Below simple steps to do it yourself.
Step 1: Open Notepad.
Step 2: Now Copy the Below Code.
@echo off
color 02
:start
echo %random% %random% %random% %random% %random% %random% %random% %random% %random% %random%
goto start
Step 3: Paste the Code in Notepad and Save it by Clicking on File and then Save.
Step 4: You will be now asked the file name and Save as Type, So name the file as Matrix.bat and Choose All files in save as type.
Step 5: Remember the Destination where you save the file. Now
Navigate to the Location where you saved this file. Double Click on it
to See the Magic.
Sunday, 13 July 2014
A gadget to control Google Glass with thoughts
A A gadget to control Google Glass with thoughts

LONDON: Focus hard and you will be able to control Google Glass with your thoughts alone. Yes, your power of thoughts can give the computer eyewear commands to do certain things, like taking a picture and even posting it to Facebook.
Developed by London-based startup This Place, the open source MindRDR app and Neurosky EEG biosensor work together to transmit users' thoughts to Google Glass.
The wearable sensor and the app analyze users' brainwaves and gauge their level of focus. Concentrate hard until a horizontal white line starts to rise on Google Glass "screen."

When the level crosses a certain threshold, MindRDR tells Google Glass to take a picture. Stay focussed and Glass will post the photo on social media.
"It's pretty cool when you have taken a picture and shared it, just by thinking," said Chloe Kirton, creative director of This Place.
The technology could also be used to help those with severe physical disabilities such as locked-in syndrome or severe multiple sclerosis.
The new app is yet to be approved by Google Glass team, reports added
Subscribe to:
Comments (Atom)